
There are many cheap and reliable hosting services for WordPress out there, and one of the best is Bluehost.
This guide is for newbies to learn how to install WordPress on Bluehost hosting.

Guide To Installation wordpress blog on bluehost
So why Bluehost?
Bluehost offers a standard cPanel hosting, which comes with Fantastico. Fantastico is one of the easiest ways to install WordPress, or you can use the manual WordPress installation method. Though, I would suggest using Fantastico because it’s really easy and effective.
If you’re still struggling to decide if Bluehost is right for you, I suggest to just go for it. It’s important that any WordPress web host meets certain technical requirements, and Bluehost perfectly meets these needs. It can handle any low-medium traffic site with ease. That said, I always recommend using a WordPress cache plugin when you are using shared/VPS hosting.
Assuming you already have a Bluehost account (if you don’t, get one here), you are ready to move ahead with this tutorial.
Log in to your Bluehost account and click on “hosting” at the top to get inside the cPanel:


On the next screen, click on “Install”:

On the next page, select the domain on which you want to install WordPress:

Note: Here you can decide if you want your domain to be with “www.” or without “www.” Nowadays, it’s all about shorter URLs, so I recommend selecting your domain without “www.” (you will get this option when you click on the dropdown),
Check that the domain is available, and click “Next”.
Click on “Show advanced options”:
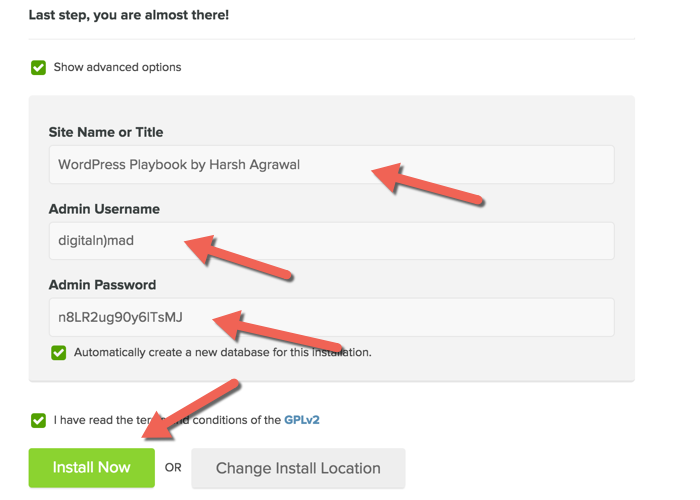
In this step, you can select your WordPress username and password for your login.
Important: Make sure you don’t select “admin” as the username. Instead, use some random username along with a complex password. Also, keep a check mark on “Automatically create a new database for this installation.”
Click on “Install Now” and WordPress will start installing.
The whole process should take about 1 minute.
Don’t close the page until you see the check mark and the words “Installation Complete”:

An email will be sent to the registered email address about the login and password information.